I spent a reasonable amount of time getting this site working how I wanted it to, and having read lots of questions from people trying to do variants the same thing, I though it was worth sharing an overview. This page is probably only of interest to website builders, and is quite a long article (you have been warned!)
The site is powered by WordPress, hosted on my own server (I’m an IT consultant by day, but this site and the partner boating site which is set up in the same way, are personal projects.)
Theme
The theme I’m using is Fukasawa by Anders Norén. This is built using Masonry, so is responsive, meaning the layout works and adapts to different size screens on phones, tablet, laptops etc. I’ve not customised it in any way. It’s also free.
Plugins
I have very few plugins enabled as I wanted to keep this site as simple to use as possible. I have auto-updates enabled for both WordPress core and every plugin, but I only take the security updates, not every version. This means that I don’t need to think about maintaining the site most of the time and can concentrate on content creation.
Barring the various security modules and analytics which I won’t cover here, as people have their own preferences on such things (and it’s also not wise to publicly share how you are securing your site) the ones relevant to the content are:
Leaflet Map
This plugin uses the Leaflet.js library to display content onto maps. In this case I’m displaying travel routes, created in the geojson format (see below.)
Leaflet allows me to display maps by adding a shortcode in the block editor when I’m creating my post.
Extensions for Leaflet Map
This plugin has lots of options that I’ve not yet explored, but the one I wanted was to be able to display some maps in full screen, which is not part of the basic Leaflet plugin.
Lightbox for Gallery & Image Block
This plugin simply makes images clickable, so that they can be overlaid onto the site in a lightbox, making them near full screen.
Creating the content
With the above plugins enabled I’m ready to start adding content. The general principle is to put everything onto the site first then assemble it into a post at the end.
I also find getting the images and maps ready before starting to create the post helps me organise my thoughts.
Uploading images
I take all the photos on my iPhone. On this trip I’ve been taking maybe 100 or more pictures a day, but clearly would not want to use all these on the site. At the end of each day I go through the photos and favourite all that I want to use, having previously emptied the favourites folder. I apply any editing or cropping, all on the iPhone.
I then use the free WordPress Website Builder app to upload the images from the Favourites folder into the media gallery. I’ve found that uploading more than 8-10 images at a time is likely to crash the upload, regardless of the connection type or speed. Also if the phone screen locks or you swap to another app while you are uploading it is likely to fail, and you can end up with partial uploads that you can’t reprocess, or remove so have to start over (I think this is a bug in the app.) In other words don’t use your phone for anything else while you’re uploading.
Once the images have uploaded, I go through them all in the Media Library and add the Alternative Text, Title and Caption. I tend to set all three the same as they are used in different places in different ways.
Uploading video
The WordPress iPhone app does allow you to upload videos but I’d advise against it. It crashes more often than not. I find that opening the site in a browser on the phone, logging in and adding the image to the media gallery there is much more reliable.
Of course hosting video on your own site has other implications, both in terms of limits on the size of the files, and space taken if you are on shared hosting. Perhaps more importantly, especially if you are getting lots of views, video streaming ties up server resources, so you might want to put them onto a video hosting site instead. I do have a couple of very short videos on this site, but anything bigger would go into a YouTube or Vimeo account.
Creating the maps
I spent so long working out how to do this, and in the end, on the last but one day of trip two I finally realised that it was easy, specifically because I was plotting railway maps. This information might be the basis of similar advice for people plotting road maps, but using a different tool (I’ve not checked because I don’t need to.)
Up that that point I’d been using Google Earth, drawing paths, saving them as KML files, then uploading them (the Leaflet plugin described above allows KML files, using slightly different syntax, replace leaflet-geojson with leaflet-kml in the above examples.) It takes ages to get paths that look smooth, and with a trip of thousands of miles, it was going to take forever. Fortunately I happened across a quick and easy solution.
For some time I’d been using Open Railway Map (ORM) to plan routes for my Interrail trip. The Signal Railway Routing site is the key. This takes data from ORM to allow you to route plan on railways. It works like every other route planner you have tried (for roads) and you can download the results. It even shows the speed limits and turns at junctions when you view the routes on screen, though these are not used for our purposes.
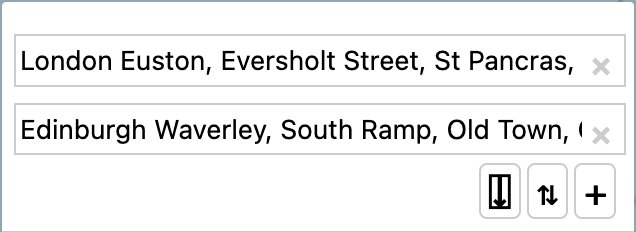
Start by putting in the start and end points of your route. The system will offer you a list of matches based on the location that you type, based on Open Street Map data. Choose something reasonably appropriate and you can fine tune it on the map by dragging the pointer.
The results are immediate, if the system can find a route. Note that ORM has not only the routes but every track on that line, so it will sometimes give you unexpected results because you start at the platform of a station which cannot depart in a particular direction, so it may take you off in a random direction to turn around first. It takes a little bit of getting used to, but after about 10 minutes I was building paths hundreds of miles long in a couple of minutes.
In general, building different paths for each individual journey work best, especially if you are exiting a station in the same direction that your arrive in (except where that station is a terminus) otherwise it will try to find a way to turn your “train” around, as above.
If the planner takes a different route to the one you wanted, you can drag it from one line to another or put intermediate marker in by clicking in an appropriate place. (The markers are not shown in the final downloaded file.)

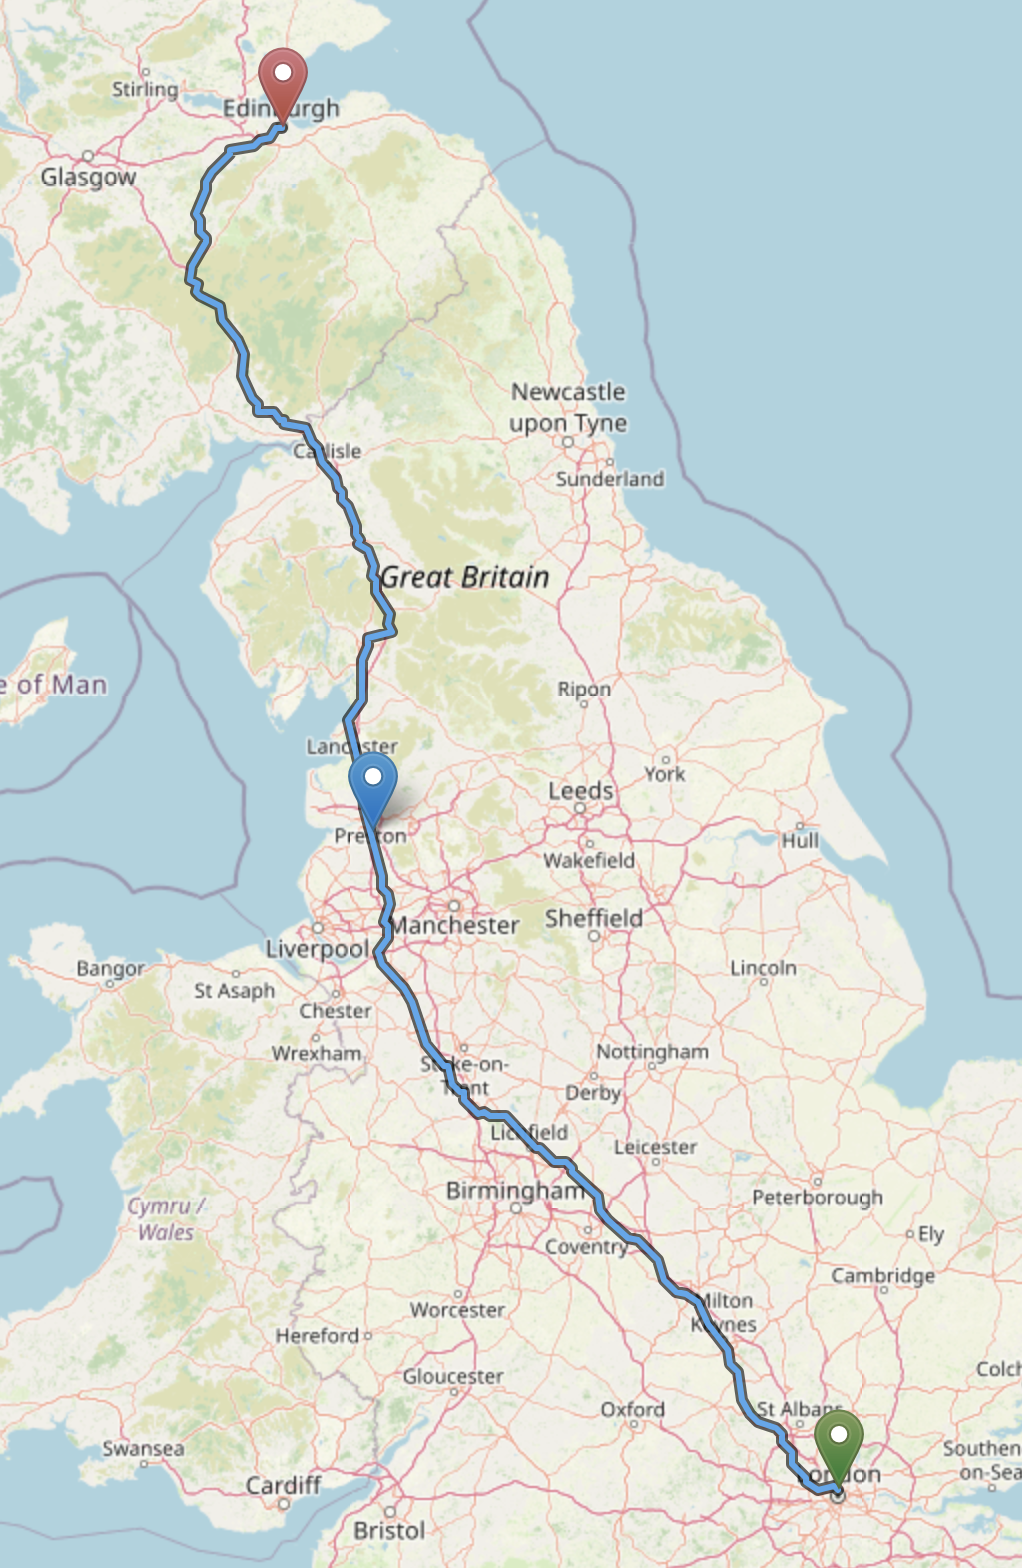
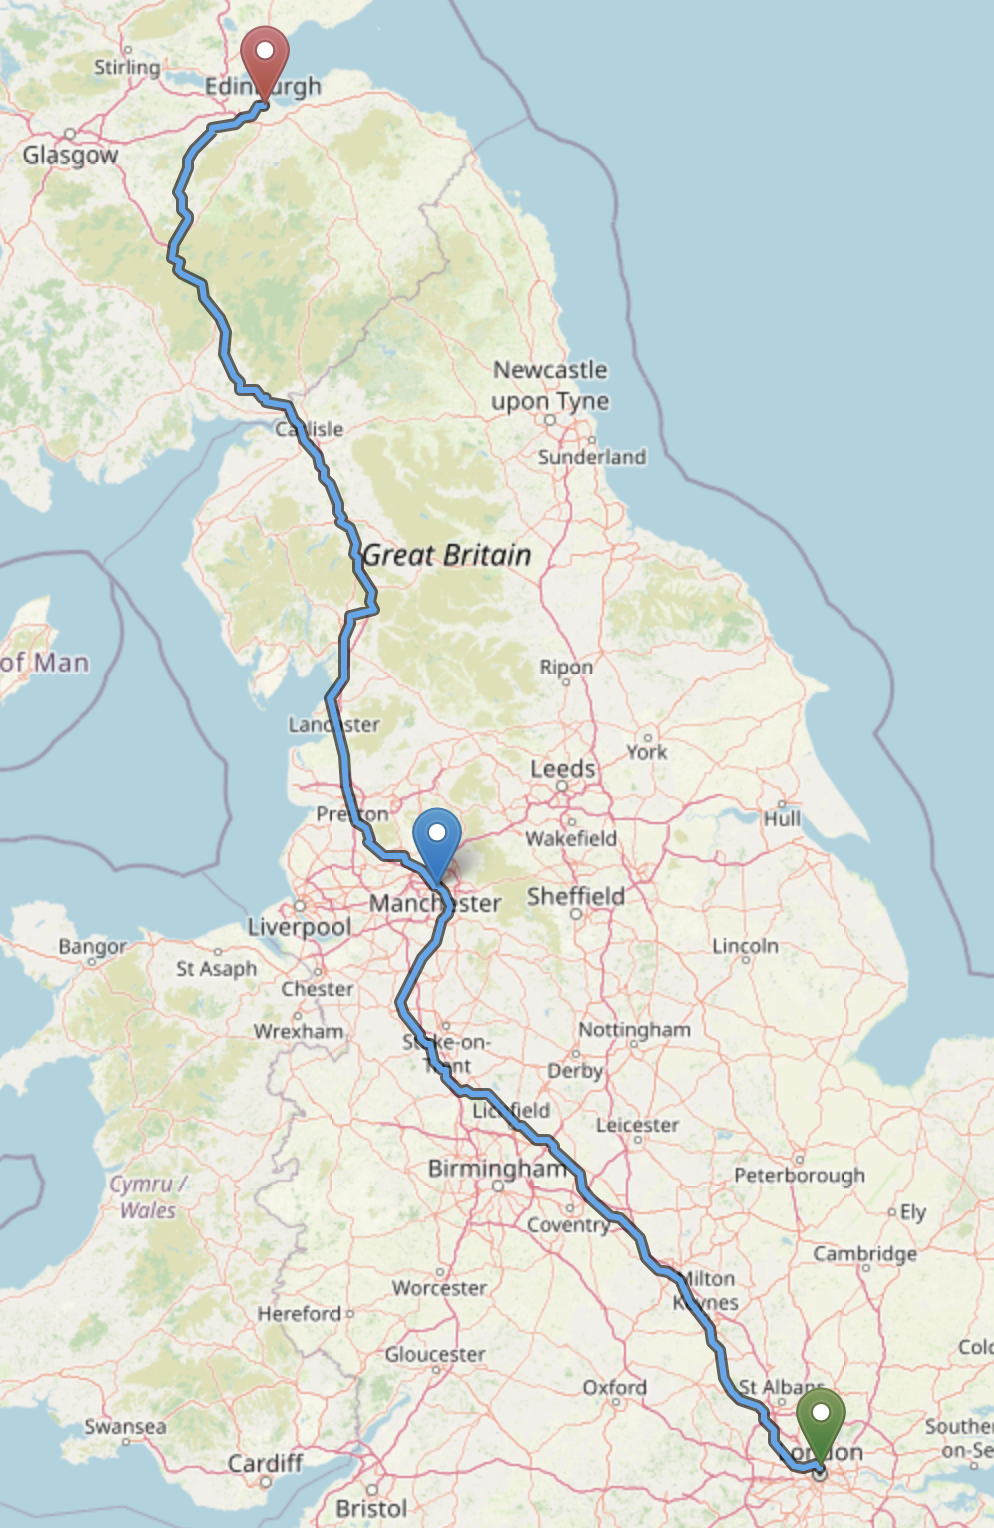
The first image above shows that the system offers two route from London to Edinburgh. If I click on the line in the area of Preston, as per the second image, it discards the east coast route. If for some reason I wanted to find a route via Manchester, as I have in the third image, it reroutes based on the point that I have added in that area. If I click a point not on the railway it will plan to the nearest point on its database.
When I’m happy I use the button ⍗ just below the destination to save a copy of this route to my laptop. I give it an appropriate name before uploading it to my website. I have chosen to store these files in their own folder (I upload them using an FTP client as I have full control of my server) but you could just drop them into the media library.
Note that depending on what security features you have enabled this might not be permitted by default but it is usually possible to permit GEOJSON files to be added to the media library.
Assembling it all
I’ve now got all the elements I need to create my post.
Content editing
There are lots of guides to the WordPress editor online, so I’m not going to repeat them here. All I will say is that I like to keep the layout simple, not using any text formatting beyond headings, plus very occasional bold and italics. That way it will work with the theme to display correctly on all devices. I generally create posts on my laptop, but have used the WordPress app on the iPhone and I’ve used a web browser on my iPad for posts on this site, and all three options work well.
Images and galleries
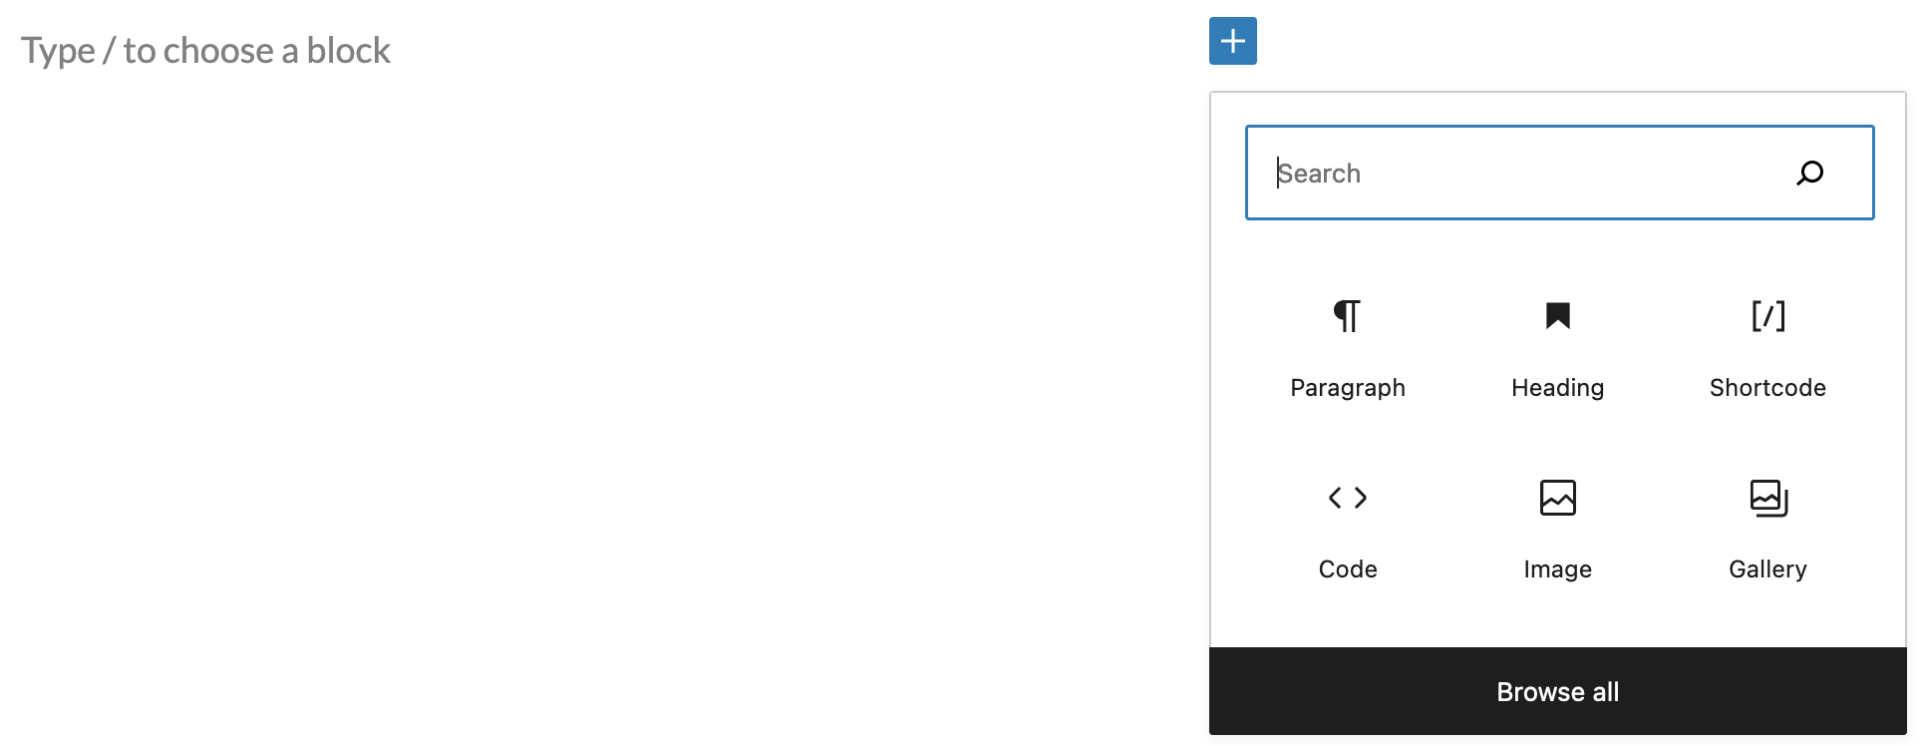
I use the image tool to insert single images and the gallery tool to add multiple images in a grid, in the block editor:
I like the gallery in that it takes multiple images from the media gallery, including captions, without me needing to do anything other than drag and drop them into my preferred order, and they will reorganise 1, 2 or 3 in a row based on the resolution of the device that is viewing them.
What I like less is that it loads and scales the full size image, which uses more bandwidth than is needed. The users sees the image at the correct size so won’t be aware, but it is a waste of bandwidth. Some of my posts are pretty image heavy – 30+ images on a pages is not unusual so I do need to see if I can overcome this and only download the smallest version of the image that is needed for the specific case.
Maps
As mentioned above, this needs the Leaflet plugin.
I display a map by adding a shortcode in the block editor. For example on Day 1 of this trip, the map at the bottom of the page is added using the following code:
[leaflet-map fitbounds]
[leaflet-geojson src=/wp-content/uploads/geojson/Day-1-Stone-Euston.geojson]
[leaflet-geojson src=/wp-content/uploads/geojson/Day-1-St-Pancras-Antwerp.geojson]
The top line says that I want to place a map onto the page. The fitbounds option scales the map to fit the content in the uploaded file.
Note: I find this is not always reliable, I’m not yet sure why, but sometimes the maps are loaded zoomed in more than they should be. It’s easy to zoom in and out but that’s not the point.
The leaflet-geojson lines describe the locations of the two files I want to show on the map. You can show as many files on the map as you want to.
I sometimes want to give the user the ability to display maps in full screen, or to display the maps taller or shorter than the default I have set. I do this on the larger overview maps. For example on the Map of places visited the map shortcode begins as follows:
[leaflet-map fitbounds height="800"]
[fullscreen]
[leaflet-geojson ...
I’ve snipped the above as at the time of writing, I display over 40 geojson files on this map. There does not seem to be a limit and Leaflet processes them almost instantaneously.
There are lots of other options available in Leaflet Maps but these are the only ones I use at present.
Last updated 10th April 2023